Blog

Quick Weekend Trip to Great Sand Dunes National Park

Jump to Zapata Falls. Jump to Rustic Rook Resort. Jump to Great Sand Dunes National Park.

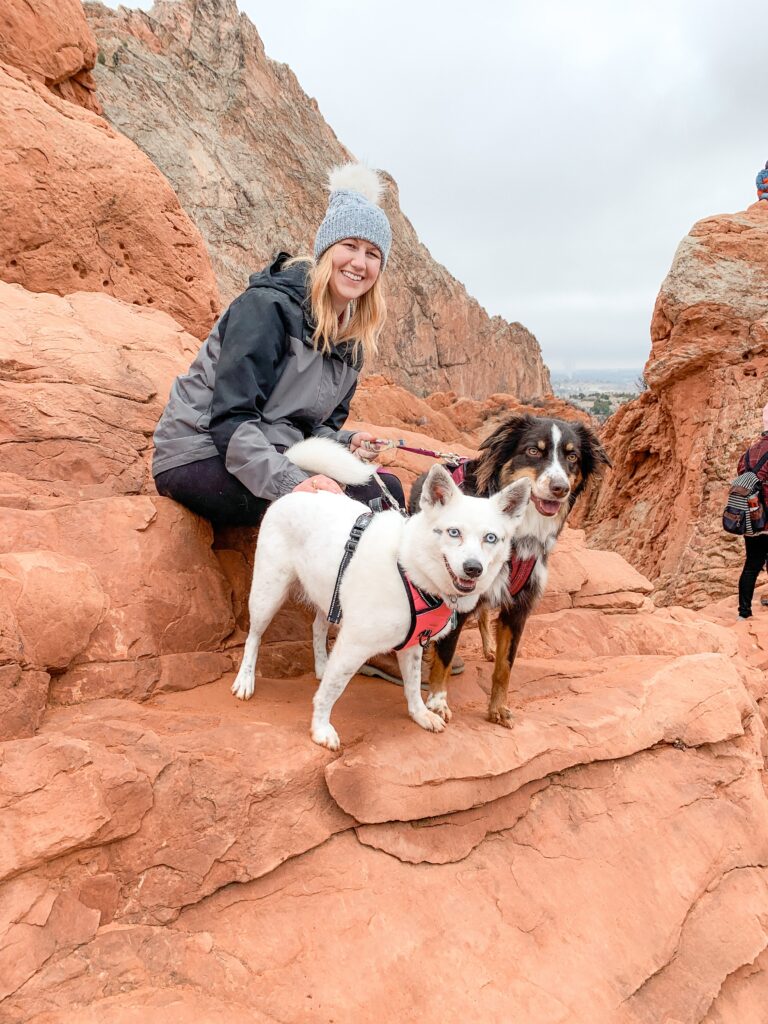
If you’re like us, you’re trying to hit as many national parks as possible. We’d like to check them all off one day — ahhh goals! Luckily for us, we live in a state with FOUR national parks! We live less than an hour from Rocky Mountain National Park, which is a treat, and we go there frequently. But we wanted to explore the other Colorado National Parks too. So we decided to make a quick weekend of it and check out Great Sand Dunes National Park and other nearby attractions around Alamosa. And the best part about this trip and the dunes is that dogs are allowed!! No boarding, and we get to take our puppers on another adventure with us! Heck yes!

Since we’re from Texas and not afraid of a little roadtrippin’, we fit this excursion into a 2-day weekend, even though it’s 4 ½ hours away.. Seriously though, ask any Texan, 4 ½ hours is nothing! We left around 7ish in the morning, planning to get there around 11:30ish to noon. Once we got into Alamosa, we ate lunch at San Luis Valley Brewing Company. They had a nice little covered tent area where we could eat with the dogs and grab a beer.

Zapata Falls

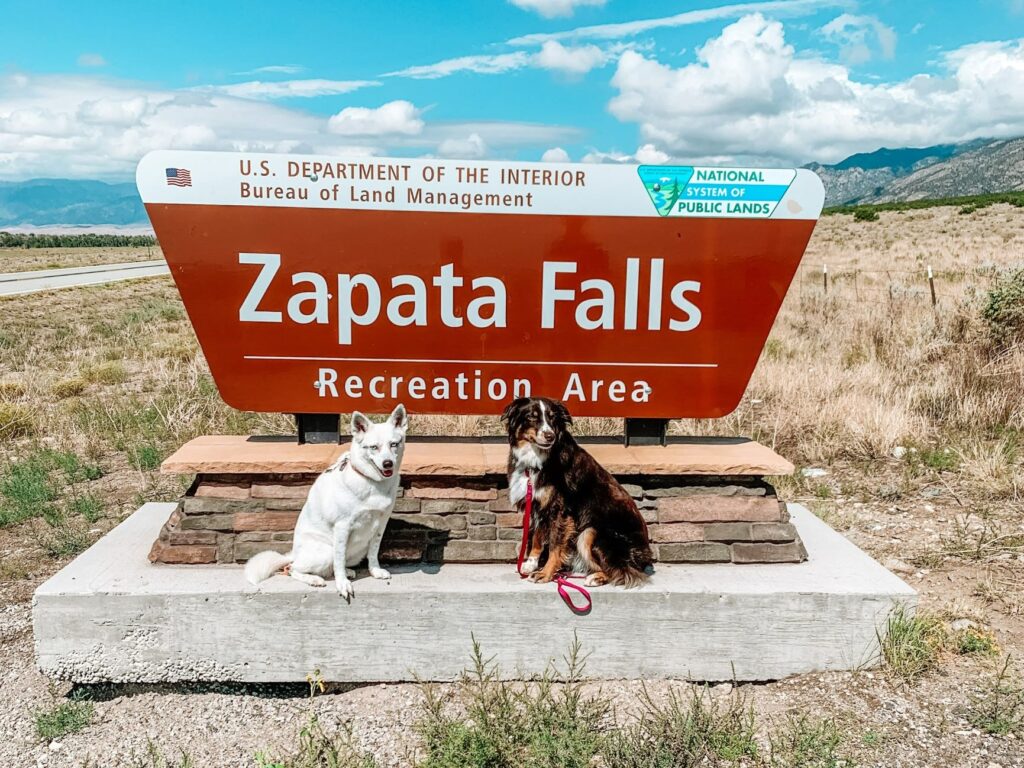
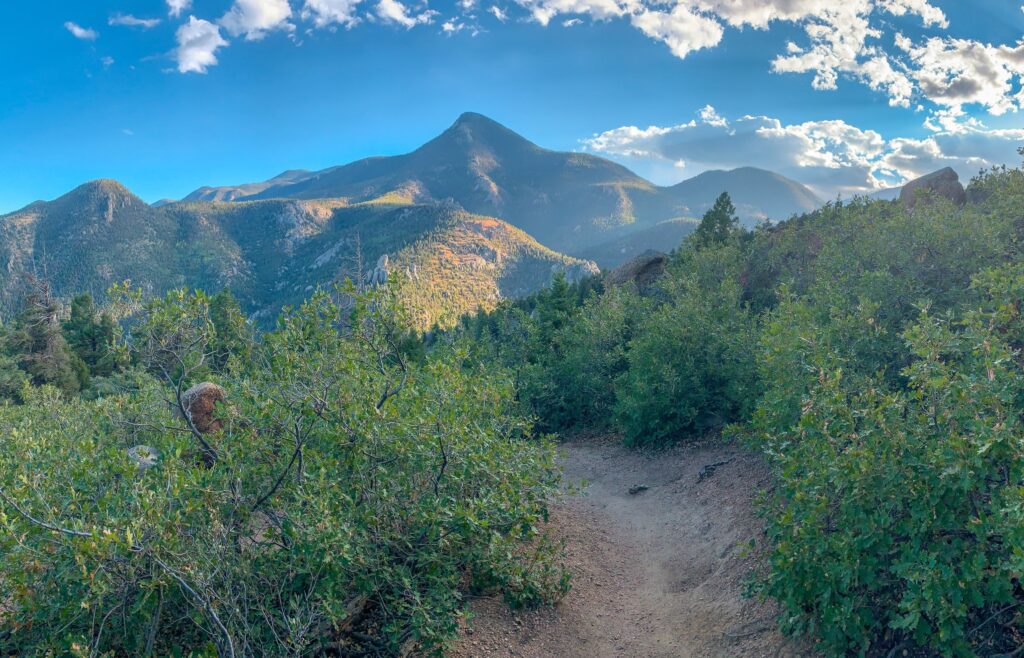
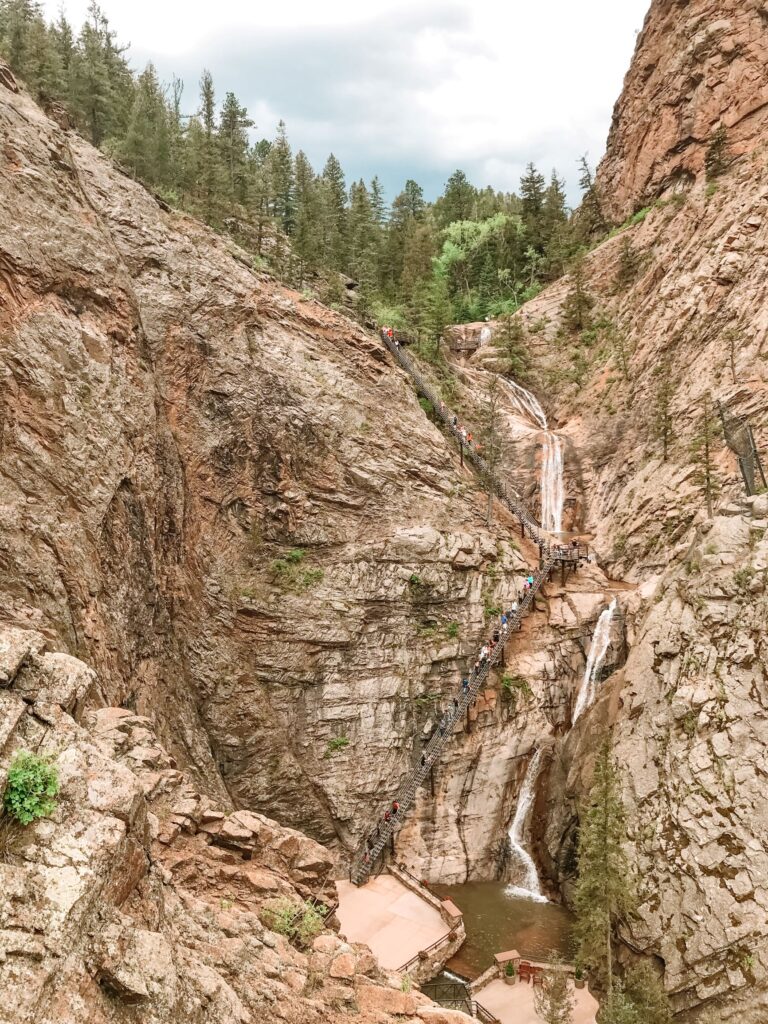
We wanted to cram as much adventure as possible into the weekend (that’s just how we roll), so after lunch, we were off to hike #1. I’d heard that Zapata Falls was a fun, easy hike where dogs are allowed with a beautiful waterfall at the end. Awesome, right?! Wrong! Well, partly wrong.

The road to get to the hike is really bumpy! They said you might need 4-wheel drive to get there, but that’s not the case. We made it easily in my 2-wheel drive Jeep Cherokee. It was just very, very bumpy! And it takes over 20 minutes on this bumpy road to get to the trailhead.

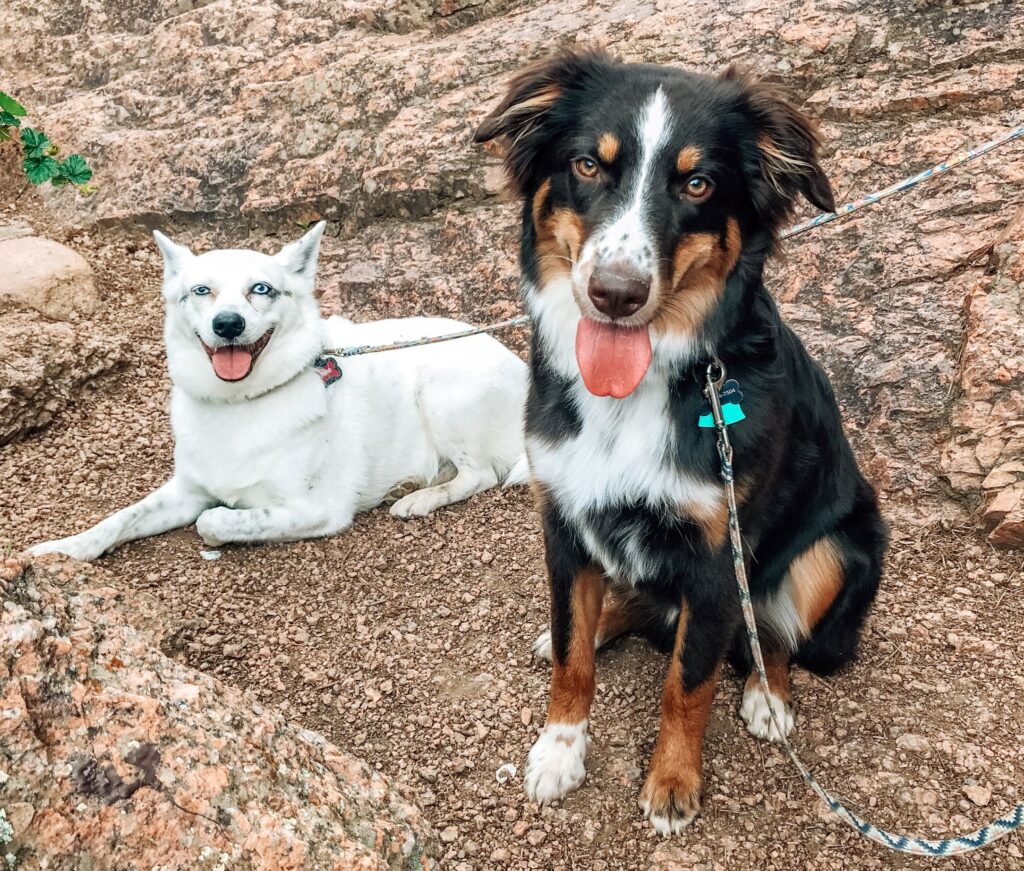
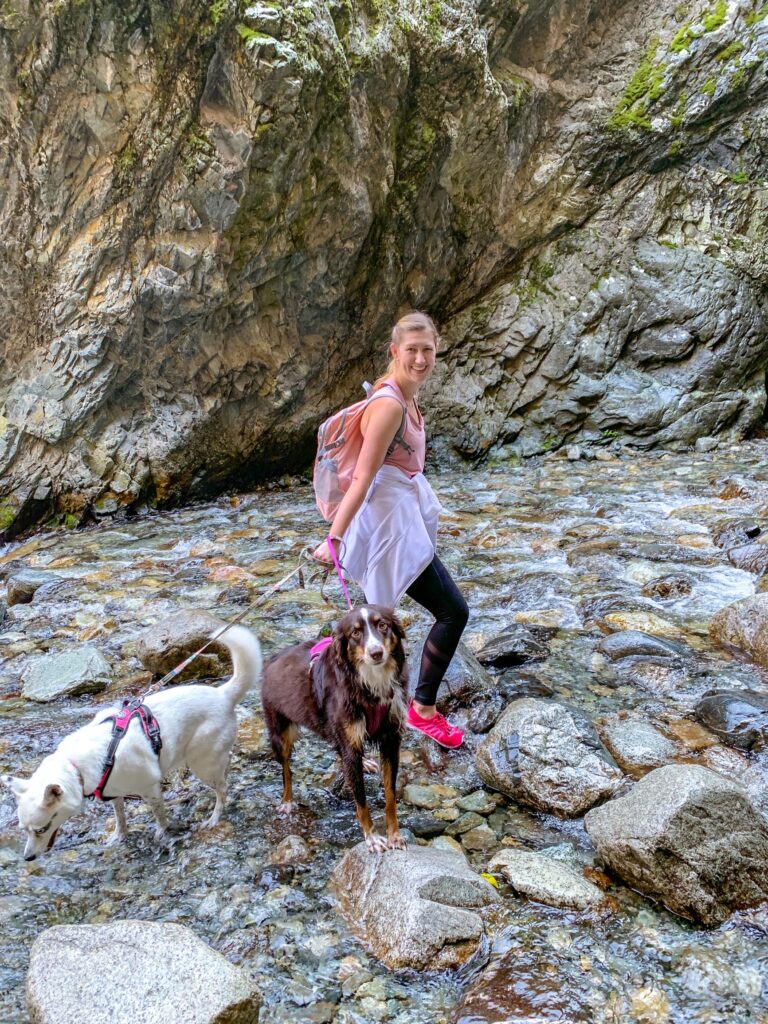
It is a short hike only about a mile total, down and back. But I must have missed the part where the trail turned into a freezing stream of water! I even looked the hike up before, and I thought it went alongside the water, or you just cross it a few times. No, you literally walk shin-deep in the water. And the water is freezing, seriously so cold it hurts! And we went in August! This wouldn’t have been a big issue if it wasn’t for our dogs. They both love water, and Juno is even a pretty good swimmer, but this was different. 

First of all, it’s kind of like a cave once you get down into the water. So the water and everything echoes pretty badly. All the sounds scared the dogs a bit. The other main issue we had was that Juno is short and had trouble navigating in the water. Bailey did pretty well, she just didn’t care for the roaring sound of the waterfall.

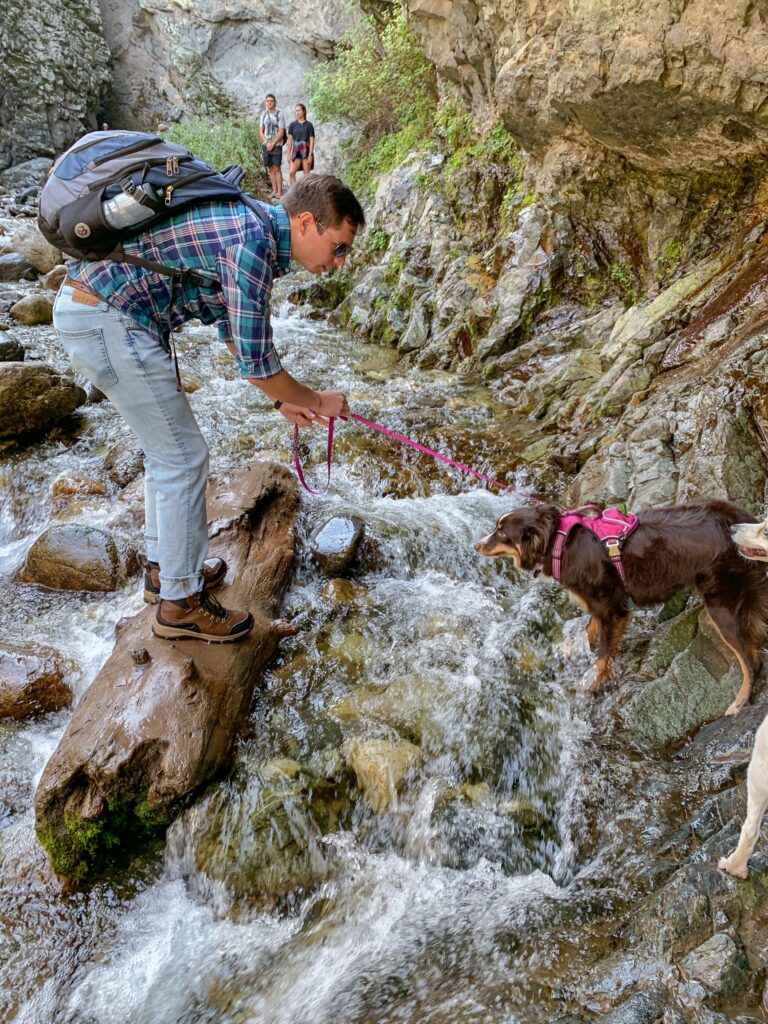
We made it to the falls and back, but let’s just say, Juno was not a happy camper. We made it up to her with cookies, scratches and she had the time of her life at the dunes. Moral of the story, just because dogs are allowed doesn’t really mean they should be there. If you’re planning on bringing your pup on this hike, make sure he’s good with water (very cold water!), doesn’t scare easily with loud noises, and I would say bigger dogs are probably better.

Zapata Falls

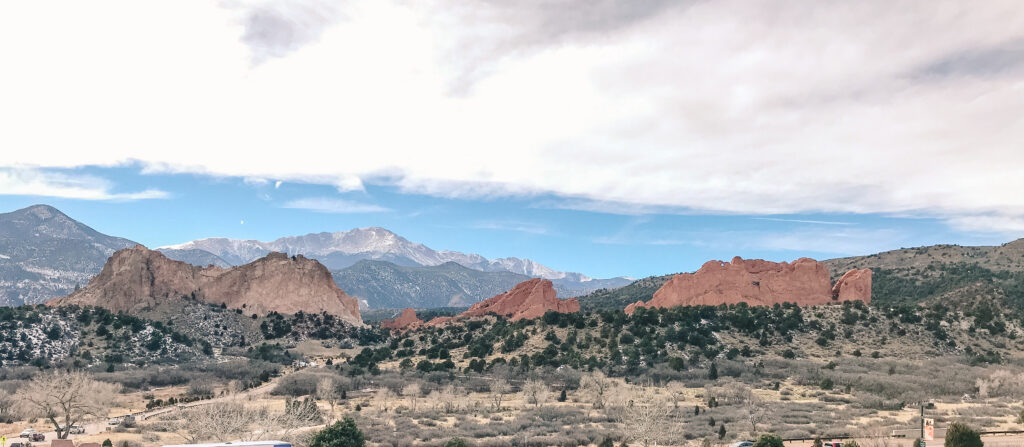
Before we checked into our “hotel”, we decided to drive through the park first, just to see it and get the lay of everything before going back to play in the sand the next day. I recommend it! Especially if you have one of those nifty America the Beautiful Passes. Seriously the best thing ever! If you don’t have one, get one! Here’s a link!

Rustic Rook Resort

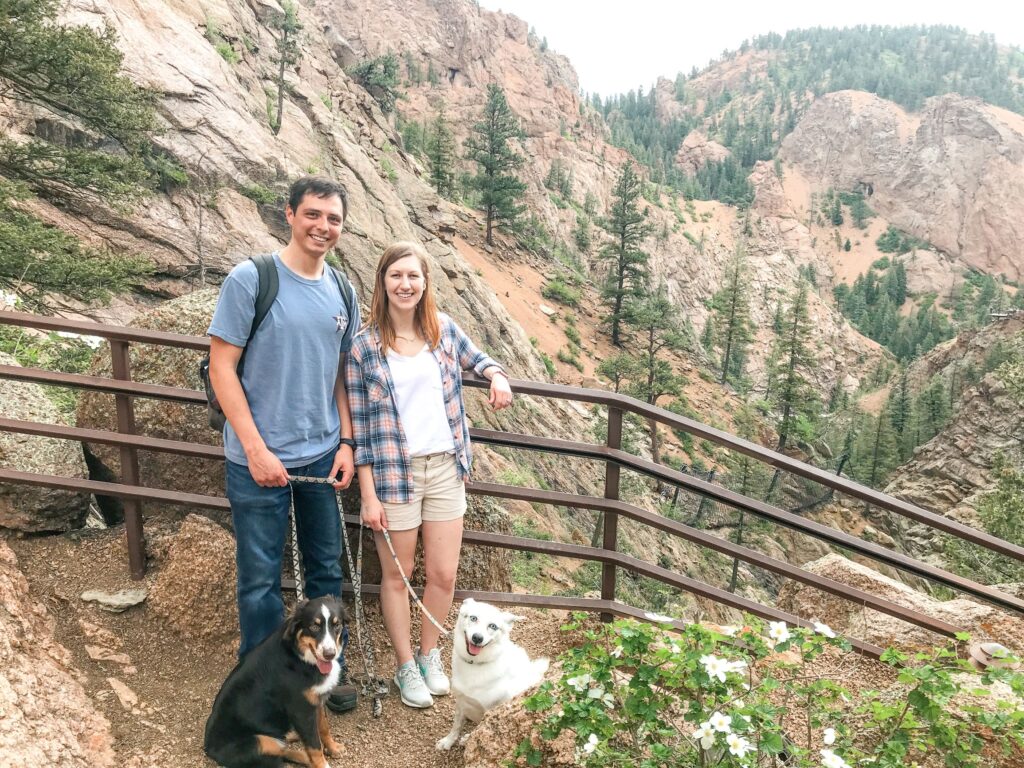
The “resort” we were staying at, Rustic Rook, was about 15 minutes away from the park in Mosca, and there is literally nothing around! Seriously! But that’s what makes it great in my opinion. Rustic Rook is this adorable “glamp” ground with onsite platform tents and a spectacular view of the mountains. Each tent comes with a king size bed, a wood-burning stove to keep you toasty at night (you’ll need it!), and a cute little porch and chairs to enjoy the view and take it all in! And bonus: they allow dogs!

There is a $25 pet fee per dog. They’re not allowed on the furniture and cannot be left unattended in the tents. We had a beautiful open field in front of us that was perfect for the pups to run around and play.

This resort was spectacular! So peaceful. And the perfect medium between camping and an Airbnb. They have on-site grills for cooking, which is great. You can even order grilling packages through Rustic Rook, and they will provide everything you need to cook. We decided to cook our own food, which worked out really well. They do serve breakfast in the morning, but they didn’t start serving until around 8 AM, and since we wanted an early start, we missed it. Another thing about breakfast, they will not accommodate food allergies. Since I’m lactose intolerant, I was hoping they could make my breakfast burrito without cheese since they say everything is made fresh. Unfortunately, they said they could not accommodate this request, but offered oatmeal. And while I enjoy a nice, hot bowl of oatmeal, it doesn’t quite hit the spot when you’re hoping for a breakfast burrito. Just something to keep in mind.

Peep Bailey 🙂

The bathroom situation was interesting. There were little bathroom trailers with 4 different sections. Each one had a shower in it. Overall, it was not a bad bathroom experience. When people took showers, it tended to flood the floors a little bit, so that was a little annoying. Since we only stayed one night, we opted to wait until we got home to take a nice, hot long shower. Some of the bigger tents actually have private bathrooms in them, including your own sink, shower and toilet if you’d rather opt for that. You can see their different options here.

We planned to wake up in the middle of the night and look at the stars since it’s supposed to be amazing on a clear night. Unfortunately, when that 4am alarm went off and Marcus peeked outside, the sky wasn’t clear enough to see well. It was a bummer, but there is always next time!

Great Sand Dunes National Park

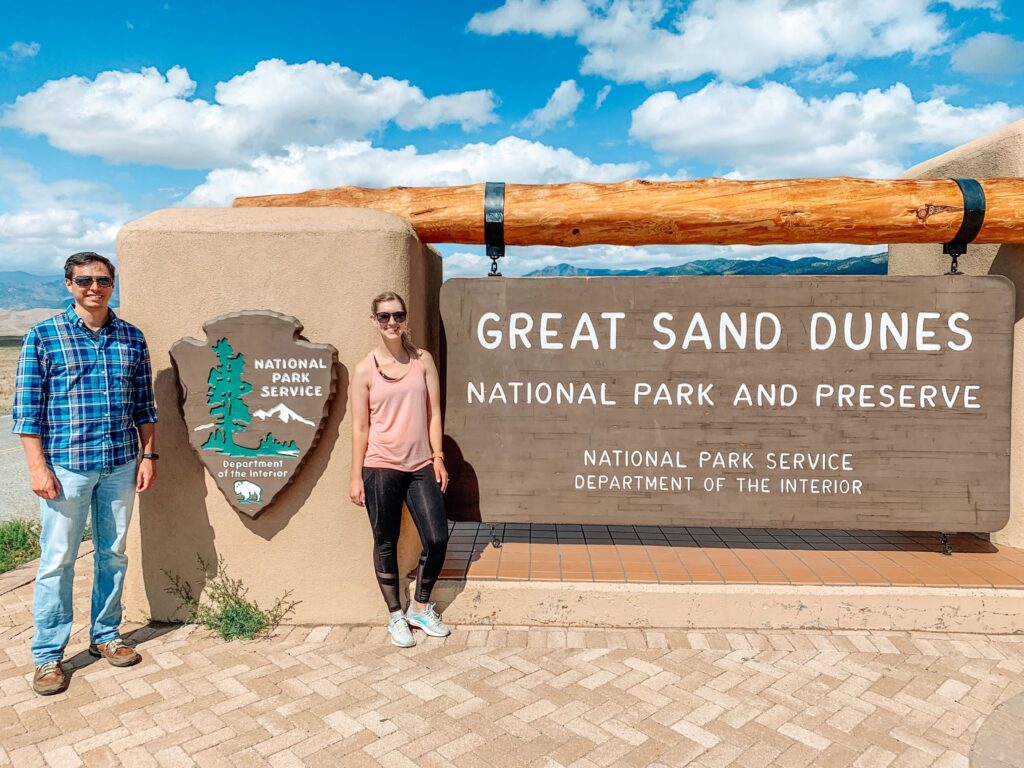
Since “the ‘rona”, one of the best places to go is outside. But there’s also been so many closures and restrictions on parks for public safety. Which is good, but you just need to know how to handle it. Luckily, Great Sand Dunes National Park is open and operating (almost) normally. The Visitor’s Center was closed when we visited, but it looks like it’s open now! Make sure to check the website for any updates about closings. 

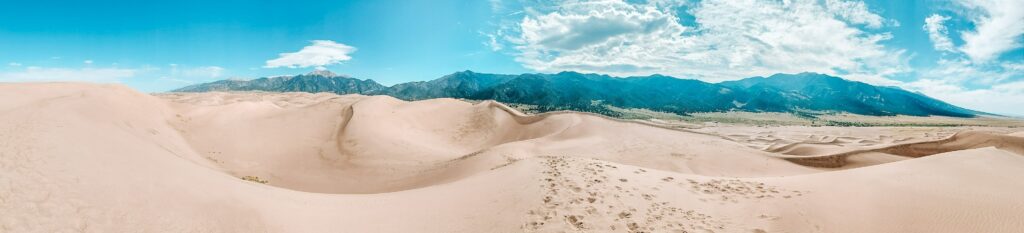
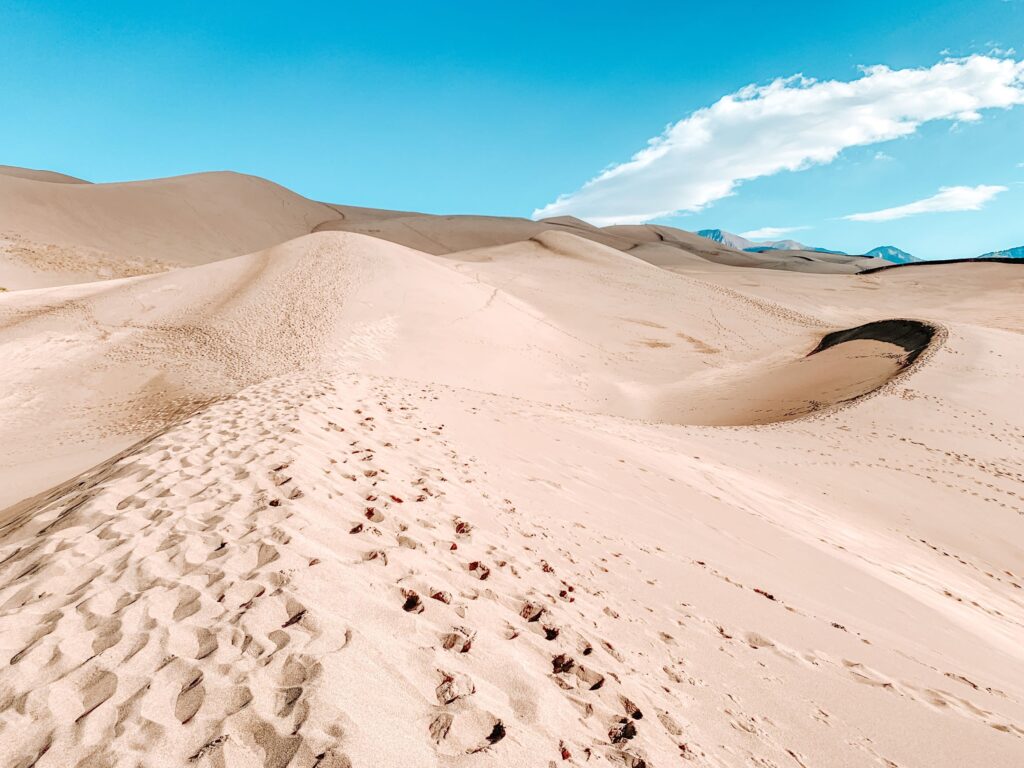
Great Sand Dunes is a great park for social distancing. It’s so big and since it’s just sand, it’s kind of a free-for-all and it’s really easy to keep your distance. Bring a mask just in case, but you most likely won’t even need it. We knew we wanted to get there early since we went at the end of August and we had the dogs with us. We got to the dunes a little after 8 am on Sunday. There were several people there, but surprisingly it really wasn’t crowded.

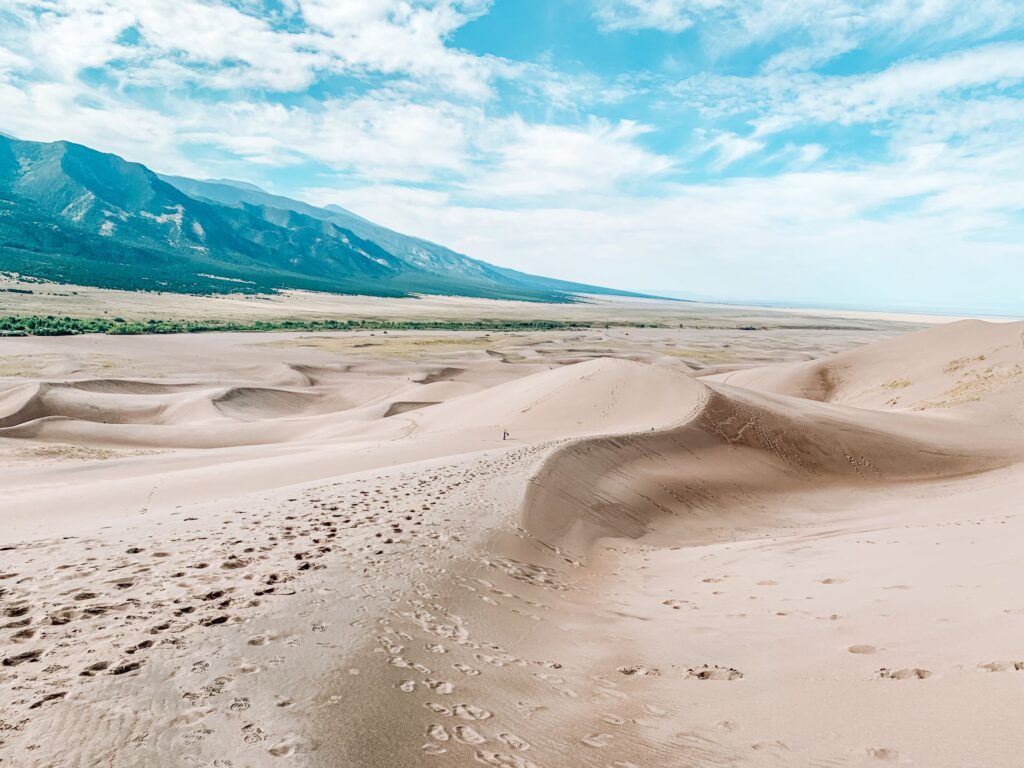
And there’s really no right or wrong way to do the park. You pretty much just climb the dunes and play in the sand. You can bring a sled to slide down the sides, which looked like a blast. We decided not to bother with it though, since we had the dogs with us.

We just climbed up the dunes. Just so you know, that sounds way easier than it is. The sand is very fine and deep. It’s pretty much like waking in 12 inch deep mud… uphill!! It’s a workout for sure, so just be prepared.

So what shoes should you wear? Ummm… not really sure. I wore tennis shoes and quickly gave up on not getting sand in them. They weighed so much by the time we were done. Marcus wore his hiking boots and mostly avoided the sand. I just didn’t want my boots to have sand in them for all eternity, so I didn’t wear them. So maybe boots, but you run the risk of getting sand in them. Okay, so any shoes you wear, you’ll get sand in them. So just think about that when you’re picking out your shoe attire for the dunes.

UPDATE: When we went to Coral Pink Sand Dunes in Utah, I decided to brave it and wear my hiking boots. They got a little sand in them, but not bad overall. The sand wasn’t as deep as Great Sand Dunes NP, though.

Luckily, it really wasn’t too hot at all. It was a little chilly in the morning, but quickly warmed up. We kept an eye (and hand) on the sand temperature to make sure it wasn’t getting too hot for the pups. And make sure to bring water! I know that’s a given, but don’t forget it! 

Pets are allowed in the main use area, which is pretty much the main dunes of the park, and must be kept on a leash. And remember to pick up after your pup.

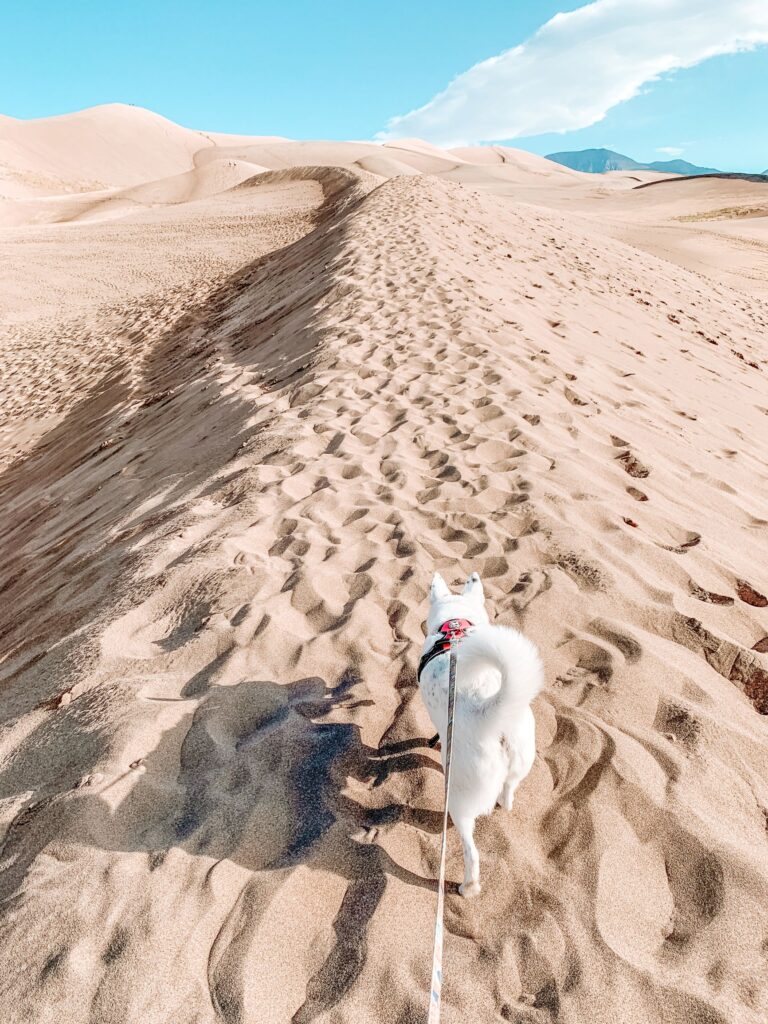
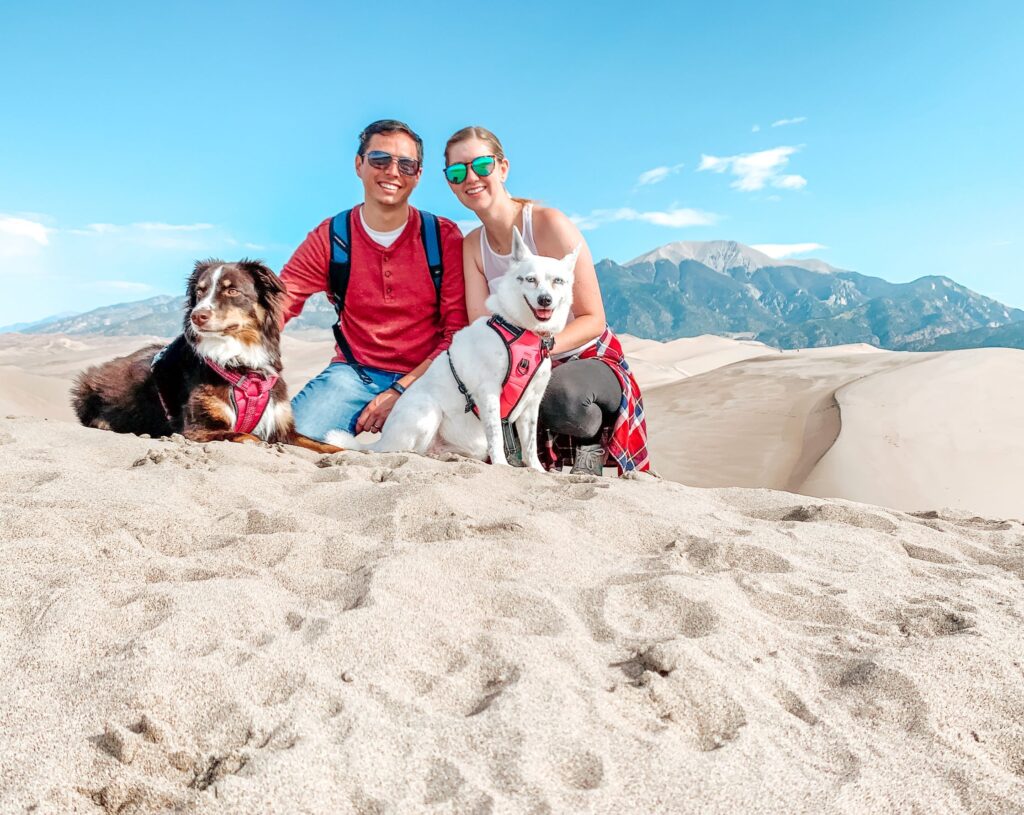
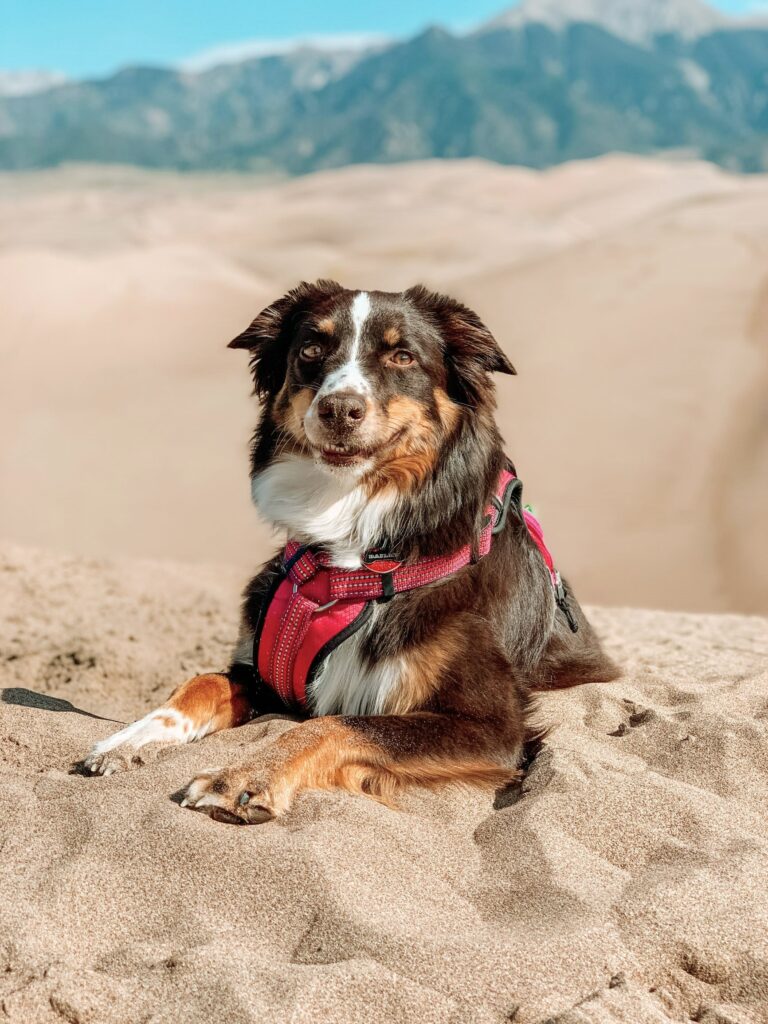
We climbed up to one of the tallest front dunes, took in the spectacular dunes and just let the puppies play and run around. Marcus ran up and down the dunes with them, and they (including Marcus) had an absolute blast.

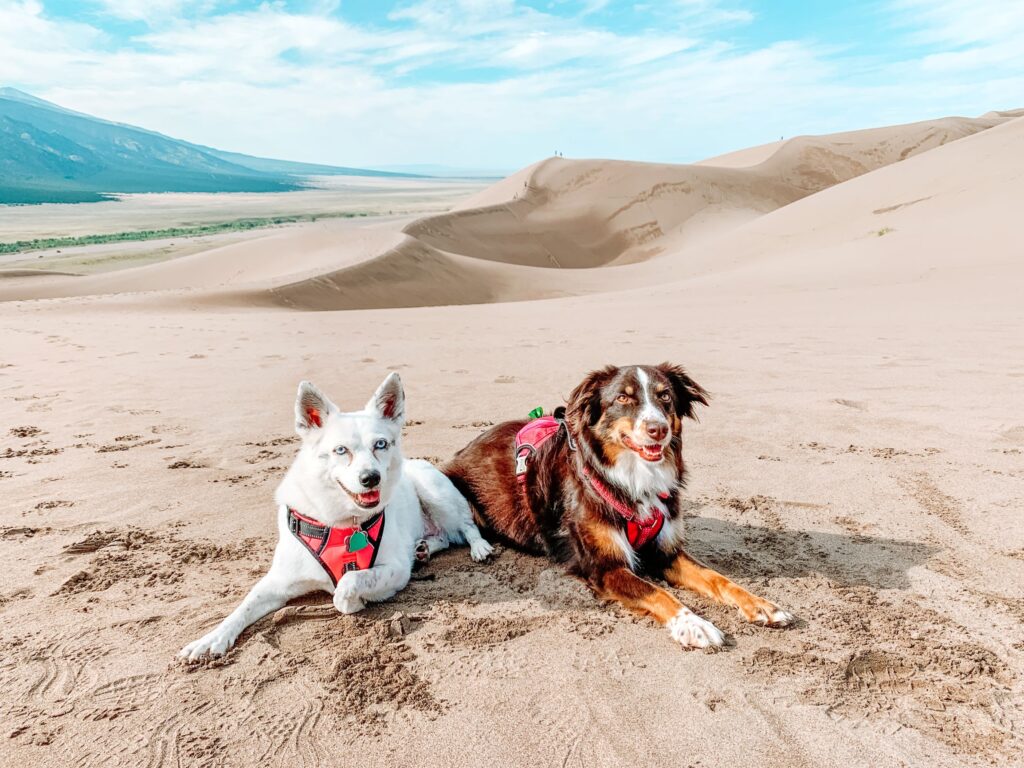
I mean just look at those happy faces!

That’s pretty much it! We stayed a few hours until almost 11am. As we were leaving, we could see lots more people arriving. I think we got there and left at a good time. This is one park that we definitely will be back to visit again! Maybe even in the winter. I hear Zapata Falls is beautiful frozen. 

Happy adventuring!

Colorado Christmas Ideas for the Whole Family in 2020

I don’t know about you, but for me Christmas has been crazier this year than ever! I’m sure it’s not a surprise after the crazy year we’ve had. And although it’s been anything but “normal” this year, I still wanted to do some Christmas-y things, and enjoy the holidays safely. Luckily, I was able to find a few Christmas activities to do that were magical and felt safe. Here’s what we did this year and a few ideas that we didn’t get to check out, but maybe you can!

Loveland Light Trail

This one is great, especially if you are in northern Colorado. And the best part is that 9 out of 10 of the spots on the trail are FREE! You can find the Loveland Light Trail Map on the Visit Loveland website here. We tried finding it at local hotels like they said online, but the hotel we stopped at did not seem to have a map this year, so your best bet is online. On this Light Trail, you get to drive around Loveland and experience some magical Christmas lights and decorations in different areas of Loveland. It was so neat! And a great family adventure. Not to mention, one you don’t have to drop a ton of cash to do.

Our first stop was the Winter Wonderlights. A must see!! Held in a park behind the shops of Centerra, this stop features a 30 minute light show to all kinds of Christmas music. It’s pretty spectacular and a great show! You’ll want to for sure bring your mask for this one, especially on the weekend. Expect it to be crowded! We took our masks off for a quick picture, but they went right back on after because there were tons of people. If you want to avoid the crowds, I recommend going on a weeknight.

Winter Wonderlights is open from 5pm – 9pm starting November 14th all the way through January 1, 2021 at Chapungu Sculpture Park. They also encourage people to bring canned food to benefit the Food Bank of Larimer County. There was a spot by the entrance to drop off the food. For more info on Winter Wonderlights check out the website here.

We were able to drive through and see the lights for stop #3 at the Promenade Shops of Centerra on the way in and out from the Wonderlights, so that’s a bonus. Next we headed over to the Outlets of Loveland to see the 12 Days of Christmas display. It’s not huge by any means, but it’s cute and worth a drive by at least.

We also made a stop downtown for #7 to see the Christmas tree. We didn’t stay very long here. But we did walk down the street to see all the lights strung across the road and to get a good look at the beautiful tree.

And my favorite stop downtown that made the trip even better… Mary’s Mountain Cookies. We saw this little shop on the way to the tree and HAD to get some cookies on the way back. And they were delicious! And so big and gooey. Totally worth all the calories. So I definitely recommend a stop here if you’re in Downtown Loveland.

The last stop we hit on the Light Trail was the Loveland Visitor’s Center. It’s a quick stop where they have the “LOVE” sign lit up in red and green. We even learned more about The Love Lock Sculpture where you can buy a lock, engrave it and lock it onto the back of the statue to signify the love you have for your family, or loved ones. It’s pretty cool, and you can learn more about it here.

There is also a fun, family game where you can hunt for gnomes at each of the stops. Find all the gnomes and you get to collect a prize and are entered to win one of the Grand Prizes. Check out the info here.

That’s it! Visit all the stops or some of the stops on the Loveland Light Trail. It’s up to you, but you’re sure to have a great time!

Gaylord Rockies

This next one will cost you a chunk of change, but it was so worth it! The first must do activity at the Gaylord Rockies is their Christmas exhibit, “I Love Christmas Movies!” It’s a HUGE 17,000 sq. foot exhibit where you walk though scenes from your favorite Christmas movies. You’ll have a guide that will escort you and your small group through the exhibit where they will talk you through all the scenes. It’s very well done and fun for the whole family. My husband and I did it and were in a group with three other adults, and we had a blast even without any children.

Not to give everything away, but here are some peeks at what you’ll see in the exhibit. They have scenes from Elf, The Polar Express, A Christmas Story, National Lampoon’s Christmas Vacation and The Year Without Santa Claus. There are tons of surprises along the way. And let’s just say, my husband, Marcus, got to be Clark Griswold and light up something special too.

Just note, you MUST wear your mask at all times while in the exhibit. You cannot take it off even for pictures. They have these markers all throughout the exhibit to help keep you distanced from other people not in your group. We felt very safe in this exhibit.

It takes about 20 – 25 minutes to get through the exhibit, but definitely worth every penny. This exhibit is open through January 3rd, and you can buy tickets here. Pricing starts at $14 per child (ages 4 -11) and $25 for adults and children 12+. You’ll need to buy tickets for a specific time slot also. Here’s the link to buy tickets for the “I Love Christmas Movies” exhibit.

There is also a small Christmas Village with snacks, some shopping, Build-A-Bear, pictures with Santa and more!

There are several other paid activities to explore, but the other one we did was the tubing. You’ll get a clean tube that you will use the whole time you’re tubing. Once you’re done, you put it in the used tube section where they’ll clean it. Unlike the movie exhibit, you can tube as many times as you want on the day of your ticket use. Tickets for tubing are $18 per person and can be bought here. Honestly, if we hadn’t bought tickets ahead of time, we probably wouldn’t have gone tubing. Don’t get me wrong, it was super fun! But we had no idea the extent of all the other activities there were also. We had fun tubing, but we would have had a totally great time without it too. Just food for thought.

And speaking of food, even though indoor dining isn’t allowed right now, Gaylord Rockies luckily is able to still make it happen – kind of. You can place to-go orders from the restaurants in the hotel and then you can eat in one of the lounges or tables they have set out. And worry not, the bars are open! I repeat, the bars are open! And they are everywhere. Don’t worry, you can grab a nice glass (okay they serve it in a cup) of wine or a cold beer while the kids are tubing or skating or whatever.

Make sure you check out all the Christmas and holiday decor around the hotel itself. The tree in the main area is beautiful.

There is so much to see inside and outside the hotel. There is a trail of lights behind the hotel that you need to check out once the sun goes down.

Like I said, there is so much to explore at Gaylord Rockies. We didn’t even do half of the activities they had. Make sure to check out their website here for more information and tickets on other activities like ice skating, ice bumper cars, a scavenger hunt and more.

If possible, I recommend going on a weekday when it’s less crowded. We went on a Monday, and it was great because we got to avoid the crowds.

Christmas in Color Drive Thru Light Show

The last Christmas activity we did was the Christmas in Color drive thru lights at Waterworld. This event is truly about as socially distant as you can get. You’re not even allowed out of the car on the property. You’ll drive through millions of twinkly holiday lights synced to music; they’ll tell you which station to use. There are so many trees, colored tunnels and singing snowmen, you’ll have a great time. Pack some hot chocolate and snacks for the kids (and yourself).

There are 6 Christmas in Color locations throughout the US, two of which are in Colorado, one in Morrison, CO and one in Federal Heights, CO. Christmas in Color will be up until January 3, 2021. Tickets are $30 per car (but with tax and fee, ends up around $35). You’ll have to pick a time slot when you buy a ticket. Make sure you arrive on time. Since the music is synced to the lights you’ll need to go in with the rest of the other cars who have the same time slot so you can see the whole show. Link for tickets here! Since you only need one ticket per car, this is a great activity for a family or group. With just my husband and I, $35 felt like a lot for what we got. But with a family, $35 is completely worth the trip.

Hopefully this helped you get some ideas for what you and your family can do this holiday season for fun, while still staying safe. There are a few more ideas listed below of other places for Christmas fun around Denver and northern Colorado that we haven’t explored yet, but look great! I hope you get to have some fun this holiday season, and have a Merry Christmas! 

Here Are a Few More Christmas Ideas

Denver Zoo Lights

Blossoms of Light – Denver Botanic Gardens 

Trail of Lights –  Denver Botanic Gardens 

Fort Collins Garden of Lights

Virtual Visit with Santa – Fort Collins Santa’s Workshop

Louisville Miracle on Main Street Pop Up Christmas Bar

Easy Dog-Safe Birthday Cake Recipe

As I’m sure you know by now I absolutely love to spoil my pups, especially on their birthdays. Each year since Juno’s first birthday with me (her 2nd birthday), I’ve made her a little homemade doggie-safe cake to celebrate. The cakes have evolved throughout the years, especially since I could never find the same recipe again. I’d take a little bit of this recipe and a little bit of that one, until I landed on the perfect combo. I am not a baker by any means, so this is a very simple recipe.

I always use a peanut butter base as my dogs are huge fans. Most of the ingredients you may already have in your pantry. Technically this recipe is human safe too, although I’m not sure how good it would taste not being a dog. The big thing you need to look out for is getting either whole wheat or unbleached flour. Bleached flour isn’t good for dogs.

This recipe is for a personal pupcake. I use a ceramic bowl about 5.5” in diameter. So obviously it’s too big to eat all at once. But it makes a great size for pictures and to share with the other pups in the household.

Here’s what you need for the cake:

  • ¾ up Whole Wheat or Unbleached Flour
  • 1 tps Baking Soda
  • ¼ cup Creamy Peanut Butter
  • ¼ cup Honey
  • ¼ cup Apple Sauce (You can also use vegetable oil. But applesauce is a great substitute for vegetable oil, plus I’ve found that it makes cakes very moist)
  • 1 tps Vanilla
  • 1 Egg

Frosting:

  • Creamy Peanut Butter
  • Plain Yogurt (optional)
  • Sprinkles or your dog’s favorite treat (optional)

Cake Directions

Preheat the oven to 350 degrees. And gather the ingredients.

Combine dry ingredients: flour and baking soda.

Mix in the remaining ingredients: peanut butter, honey, applesauce, vanilla and egg until you have a thick batter.

I have found over the years that the batter is a little too thick. So just add some water until the batter is more of a usual cake batter consistency. It’s okay if that batter is still a little thick, as most of the ingredients are thicker.

Make sure to grease the pan your planning to use. 

Pour the batter in the pan and fill it up about half way up the pan. Also note that the cake will rise… A LOT!

If I have left over batter, I like to make mini pupcakes. Sometimes I even give these out to friends for their pups.

Place both the cake and mini pupcakes in the oven.

The mini pupcakes will only need to go for about 10-15 min.

The cake will need to go for about 30 -35 min depending on how deep your pan is.

You can check with a toothpick to make sure it’s done.

Let it cool. I like to cut the top off the cake to make it look flatter. 

Make sure it’s completely cool before frosting.

Frosting: 

Mix together peanut butter and plain yogurt in a bowl. There is not really an exact measurement for this one. I just mix until I get a good color and consistency. 

I just recently started adding yogurt to the frosting. I generally only use peanut butter to “frost” the cake. But I wanted to get a lighter color for the frosting, so I added yogurt. Just make sure you get the most plain, non-fat yogurt you can find.

Decorate with a few sprinkles, your dog’s favorite treats and maybe a candle.

To store leftovers, place in airtight container and store in fridge for a few days. 

TaDa! My pups absolutely love this cake. And I look forward to making it for them on their birthdays each year.

Pumpkin Patch & Spooky Adventures at Anderson Farms

Halloween is only a little over a week away! Can you believe it?! Fall has always been my favorite season. You got football, Halloween, changing leaves (at least here in Colorado), sweater weather and my personal favorite, my birthday! So yeah, I’m a little biased, but I love Halloween! And I always insist on going to a pumpkin patch, because honestly that’s way more fun than picking one out at the grocery store.

This year we had our little fall adventure at Anderson Farms in Erie, CO. It was just my husband and me and we had an absolute blast! They have so many awesome things to explore including a pumpkin patch, farm animals, a GIANT 25-Acre corn maze and even fun after-dark activities.

Since the pandemic, Anderson Farms has to limit the number of guests they allow into the property at a time, so you have to purchase your tickets online. General admission tickets are $12.00 each (with a $0.50 processing fee). Kids 3 and under are free! When you purchase tickets, you also must select an entry time (again… Covid guidelines). A general admission ticket will get you a wagon ride to the pumpkin patch, the huge corn maze, the playground, farm animals, and the petal karts. Right now, masks are required for those 11 years and older in the attractions or anywhere you cannot remain 6ft away from others. Anderson Farms is open weekdays and weekends during October, most days from 10am-10pm. They are closed on Tuesdays though.

We decided to go on a weekday in the early evening, hoping to avoid the large crowds, which totally worked! When we arrived, we decided to do the pumpkin patch first before it started getting too dark. Luckily, there wasn’t a line for the wagon, so we just hopped right on. A tractor will take the wagon on a short drive up to the pumpkin fields. Now, I had never really seen a pumpkin patch before, like one that is actually growing the pumpkins. Generally the pumpkin patches I’ve ever gone to have had the already picked pumpkins displayed on wood pallets, and you just choose from those. This was very different! The field is mostly dirt and the pumpkins are still on the vines. There are lots that they have already “picked” and placed alongside the paths, so you can also pick from those. But I wanted to pick ours from the vine! Tip: If you plan on picking a pumpkin from a vine, it might not hurt to bring a pocket knife to cut it.

After traipsing around the fields, I decided I wanted some more unusual pumpkins from the farm, because we could get normal orange pumpkins at the store. Once you pick your pumpkin, there is a chart where you can see how much the pumpkin will cost. The price seemed to start at $2 and go up to $12.

Once you have your desired pumpkins, the wagon will drop you off at a little shop back on the main part of the property to pay. There are more pumpkins to choose from here as well, including teeny, tiny $0.50 pumpkins and interesting looking gourds. We decided to put our pumpkins in the car so we could enjoy the rest of the farm. They will let you back in if you leave, but make sure they mark your wristband. There is also a small pumpkin patch in the main area of the farm if you have someone in your party who can’t climb onto the wagon or walk through the fields, which is great for young children and the elderly. 

The cute little “downtown” area has several attractions. There’s a barn, farm animals, pumpkins everywhere, a few food stands and the “World’s Largest Man-made Pumpkin”.

The corn maze is actually a-maze-ing! (You know I couldn’t help myself!) But seriously, it’s huge. It is 25-acres and has over 8 miles of trails. So naturally we did not do all of it. We did the middle length maze that ended up being a little over 1.5 miles. There was a clue type game that you could play in the maze to figure out something like who kidnapped the farmer. Make your way to the different checkpoints, and you’ll punch your card and rule out suspects until you find the culprit. It was a pretty fun game that kept us entertained. We also did the toddler maze that is a little under a mile, just to see if I could navigate my way through without the assistance of my husband. We could have spent so long in the maze! And honestly I didn’t expect it to be as big as it was. But I was very happy with the trail we decided to do. The website suggests you allot about 2 hours for the maze. And remember, there are no bathrooms in the maze, so go before! The maze is also open after dark, but remember to bring a flashlight to help you see! 

There is a whole other side to Anderson Farms at night, if you choose! According to the website, Terror in the Corn is one of the largest haunted attractions in Colorado. We did not do it, but it sounds scary! First they drop you off in the dark in the middle of a scary corn field. Then you must find your way back through the cornfield and make your way through the “Haunted Town”. Perfect if you think people jumping out and scaring the you-know-what out of you is your idea of fun! There is a creepy background story that you can find online explaining how the town got there and the murderous twins who mysteriously disappeared. You can find the story here.

The other after-dark attraction is the Zombie Paintball Hunt. On this adventure, you’ll board a trailer that will drive through the “Snowbrier Containment Facility”. There will be paintball guns attached to each seat of the ride. Participants will shoot as many zombies as possible to try and save the last of the human race. Exciting, huh? There is a fun, background story that goes with this attraction as well about an escaped bio-weapon. You can find that here.

Tickets for Terror in the Corn and Zombie Paintball Hunt are only available Thursday – Sunday. Tickets for Terror in the Corn will cost you either $27 or $30 depending on the day. Tickets for Zombie Paintball Hunt are $25 or $27 depending on the day. However, with a purchase of these tickets, you will not need to purchase a general admission ticket. These tickets will get you anything a general admission ticket would. Terror in the Corn is not recommended for children 10 and under, while Zombie Paintball Hunt is not recommended for children 5 and under. I’m sure some of that would give me nightmares, so I get it! 

As you can see, there is so much to explore at Anderson Farms. And there is something for all ages, for families or a group of teenagers. I highly recommend checking it out! I know we will be going back next year to explore the new design of the corn maze and maybe shoot some zombies.

Hiking Koko Head vs. Manitou Incline

What possesses us humans to climb up insane inclines to the top of mountains? The view? The rush? The climb? Personally for me, it’s the accomplishment! That feeling of pure “I made it!!!”. And yes, the climb is generally brutal. But making it to the top is so worth it!

I’ve done two of these inclines: Koko Head in Oahu, Hawaii and the Manitou Incline in Manitou Springs, Colorado. After doing both, I figured I’d compare the two journeys.

Koko Head – Oahu, HI

A few years ago, my brother was in the military and stationed in Oahu, Hawaii. Pretty cool, eh?! My family and I were lucky enough to visit him…. Twice! Once in 2012 and once in 2013. The second time, my parents even let me bring my then boyfriend (now husband, Marcus)! **Thanks Mom & Dad!!** We hiked Diamond Head, which is a pretty touristy hike, but nonetheless gorgeous at the top! But overall an easy hike. I’m not sure who in my family had heard of Koko Head, but we decided to hike that one next.

Here’s some background on Koko Head. The military actually built a bunker on the top of Koko Head during WWII. They installed railroad ties for the tram to bring supplies to the lookout bunker at the top. Koko Head contains 1,048 railroad tie “steps” to get to the top, about 1.5 miles long, and an elevation gain of about 1,000 ft. 

I’ve actually been lucky enough to hike Koko Head twice, once on each of our Hawaii trips. But since the two hikes kind of blend together for me, I’ll just talk about my overall Koko Head experience.

When you’re at the base of the hike looking up, I felt a mix of “wow” and “that doesn’t look that hard!” As I mentioned the steps are just large railroad ties, originally installed during WWII. So the steps are getting pretty worn, and the distance between each tie is pretty significant. The weather throughout the years has also shifted the ties. That was probably one of the most difficult things for me personally, being short.

The trail starts out pretty moderately, then starts getting very vertical near the top. We took several breaks! I know Marcus probably didn’t need to stop as much as I did, but thanks for being a team player, honey! Since it’s been so long, I don’t know exactly how long it took us to reach the top. Probably 45 minutes to an hour?? It’s definitely not easy by any means! Those big, steep steps all the way to the top are pretty killer! But the view was completely worth it, both times!

We hung out at the top for a few minutes, reveled in our accomplishment. Took in the beautiful Hawaiian sights. Snapped a few pictures. At the top, there are still several remnants of the bunker that was once there as well as some killer views! Then it’s back down those 1,048 railroad ties you go!

Views from the top of Koko Head

Naturally, it’s way faster going down than it was climbing up. But the big thing you have to worry about on the way down is tripping and falling on the ties. So be just as careful, if not more so, coming down as you do going up. You also have to watch out for people coming up the incline. It gets a little tricky when the ties are pretty far apart. You’ll often see some people almost crawling down when it gets too difficult or too far between ties. And when you reach the bottom, congratulate yourself for a job well done with a Hawaiian Shave Ice!

Manitou Incline – Manitou Springs, CO

Ever since hearing about the incline from my sister-in-law, I knew we had to do it! I mean we already hiked Koko Head, so how hard could it be? I just laugh at myself now for thinking that. We just recently hiked the incline at the beginning of September, amid a pandemic. The incline was actually closed for several months due to the pandemic and just reopened in August. Just note, you do need to make a reservation to hike the Manitou Incline right now as they are trying to limit the number of people on it at once. It’s free on the website

Somewhat similar to Koko Head, the railroad ties were installed on the Manitou Incline to bring supplies up to Pikes Peak. That however quickly changed into a tourist attraction carrying tourists up the mountain. In 1990, the railway closed. Unlike Koko Head that still has the rails on the path, the rails for the incline were removed. Unfortunately, the incline land wasn’t public property and was actually owned by three different companies, so hiking up was illegal. But that apparently didn’t stop everyone. Luckily, they finally came to an agreement in 2013 granting the public access to hike the Manitou Incline.

There is free parking in Manitou Springs at the Hiawatha Gardens. Although it’s free, you still need to print a ticket at the kiosk to show to the staff at the base of the incline. After parking, you can then take a free city bus to the incline. The bus stop is right in front of the Hiawatha Gardens building. The ride to the incline is only a few minutes. We had to show our reservations and parking ticket at the bottom of the incline before we were able to climb. Then up we went!

Fun fact: The number of steps on the Manitou Incline sometimes changes due to maintenance. If you look it up, you’ll find that there are 2,744 steps. However, when you reach the top, you’ll see it labeled as 2,768. The incline is .88 mile long with an elevation gain of about 2,000 ft. It’s no easy hike!

The incline starts out pretty moderately. So you’re thinking, “okay, it’s not so bad!”. Then it gets worse! A fun way to keep track of where you are on the incline are the little silver plates on the bottom right side of the steps that will show you where you are every hundred steps. Once the trail starts to really slant upwards, it gets drastically more difficult. We stopped many, many times on the way up. To be fair, the altitude is killer!! Seriously, that’s the worst part. My asthma was kind of kicking my butt too and since we’ve had so many fires lately, the air quality wasn’t the best either.

Beware of the false summit! Luckily, we knew it was coming so we didn’t get excited when we saw we were close. It’s probably about ¾ up the trail, but there is more to go! It starts getting really, really steep near the top, almost vertical! Yes, I’m exaggerating a little bit, but you get my point! We probably stopped every 20 – 50 steps as we got near the top. That’s when the altitude is the worst, your butt and calves start really feeling it from climbing for so long and you’re just all around tired!

But once you reach the top, it is a feeling of pure accomplishment! “I did it! I’m alive! I think I need to sit down for a second and catch my breath before I pass out.” Aside from the rush of just reaching the summit, the view is pretty great too! Unfortunately, we didn’t want to stay too long because the climb took a bit longer than expected. We knew we still had to get down the mountain and didn’t want to leave the dogs for too long home alone. But we did take a few minutes to breathe it all in.

Unlike Koko Head, you’re not supposed to go back down the stairs, especially due to pandemic guidelines. I was kind of relieved. Instead there is a trail that takes you back down another side of the mountain, Barr Trail. It’s about 4 miles long, but it’s fairly easy after the climb. And it’s all downhill! Whoop! Once you reach the bottom of the trail, hop back on the bus and ride back to your car.

Koko Head vs. Manitou Incline

Overall, I’m pretty confident in saying the Manitou Incline was harder than Koko Head. Not to say Koko Head was easy, but there are more elements going against you at the incline.

Altitude for one. The altitude at the top of Koko Head is about 1,200 ft. Whereas the altitude at the Manitou Incline is about 8,500 ft. That’s over a 7,000 ft elevation difference! And trust me you feel it! 

The elevation gain over the course of each incline is another difference. For Koko Head, you gain about 1,000 ft in about 1.5 miles. For the incline, you gain about 2,000 ft in less than 1 mile. 

I will say that the Manitou Incline is much better maintained than Koko Head. Koko Head for one, still had the rails on the trail which add a little more difficulty. The ties at Koko Head are more worn down than at Manitou and there seems to be much larger gaps in between these ties as opposed to Manitou.

Even though the view at Manitou Incline is spectacular, it’s pretty dang hard to beat the view of Hawaii and that gorgeous blue ocean. So as far as which one I enjoyed more, Koko Head all the way! 

Koko Head was hard. Manitou Incline was harder. Would I hike both again? I’d hike Koko Head again in a heartbeat. I mean I’ve already done it twice! Manitou Incline…. I want to say yes. I would like to hike it again (but not anytime soon!) and try to improve our time. Maybe even train a little for it. We’ll see. Luckily for me, it’s just a couple hours away.

These are all just my opinions from my personal experience. I dare you you climb both and see for yourself which one you enjoyed more and which one you thought was harder.

Royal Gorge Bridge & Park – Bring the whole family!

Royal Gorge is a treasure of Colorado, located about an hour southwest of Colorado Springs. And it is as magnificent as the name suggests! Our first encounter with the Royal Gorge was on a train ride aboard the Royal Gorge Route Railroad. While on the train, the guide pointed out a bridge way up at the top of the gorge. And we knew we had to walk across that bridge! 

Royal Gorge Bridge and Park is a super fun place for the whole family, including the fur-kids! With your general admission ticket, you get entry to the bridge, theater, visitor’s center, playground and the gondola.  But honestly out of everything, the bridge was still my favorite! Online adult tickets (13 years and older) are $27, children 6-12 are $22 and children 5 and under are free. 

I recommend going early to avoid the crowds, especially on a weekend! All the rides and the visitors center open at 10 am, but the bridge opens at 8 am. We decided to get there about 9 am to enjoy the bridge before it became too busy. (Highly recommend!!) When we arrived, there were only a handful of cars in the parking lot, versus when we left a little after 12 pm, the lot was nearly full. 

Since the visitor’s center wasn’t open yet when we got there, we went straight into the park and down to the bridge. On the way down to the bridge, there are several scenic spots to take pictures, so make sure to explore. There are several places in the park to grab a bite to eat, a drink or a quick snack. You’ll get a map upon entry which will have the locations of all the attractions.

Royal Gorge Bridge has had quite the history. Completed in 1929, this bridge sits 955 ft above the Arkansas River. The bridge held the record for the world’s highest bridge from 1929 – 2001 and is still the highest bridge in the United States. In 2013 the park was nearly destroyed by a wildfire that consumed about 90% of the 360 acre park. Thankfully, the bridge itself was left untouched except for 100 burned boards that had to be replaced. More about the Royal Gorge and the bridge’s rich history including times of Native Americans and Railroad “wars” can be learned onsite in the Plaza Theater. They even have a mini documentary and a Historical Expo with photographs and historical items of the Royal Gorge.

The bridge itself is pretty awesome! It is “America’s Highest Suspension Bridge” sitting 955 ft high. The bridge is made up of 1292 wood slats, and is 1260 ft long. You’ll see along the railings of the bridge are all 50 state flags, and we of course had to take a picture of our favorites. You can spend as much time as you like on the bridge, even walk back and forth. We definitely spent most of our time on the bridge. We were even lucky enough to see the Royal Gorge Train pass under us!

As I mentioned, dogs are allowed. We love taking our pups on adventures, so this was a big plus! Dogs are allowed almost anywhere in the park, except indoors. Yes, they’re even allowed on the Aerial Gondolas!

The lady at the ticket booth recommended that we take the gondola on the far side of the bridge and to get in line a few minutes early since the lines can get pretty long. We probably ended up in line right about 10 am. We waited no more than 30 minutes for the gondola. Right now (because COVID) each group gets their own gondola, and they sanitize after each group. So the wait does take a little longer than usual, but totally worth it in my opinion. 

Aerial Gondolas will take you 2200 ft across the Royal Gorge to the other side, alongside the bridge, 1200 ft up. The ride is really fun, but really SHORT! Seriously don’t blink or you’ll miss it, which I almost did. You can ride it as many times as you want, but you will have to wait in line each time. Again, I also recommend crossing the bridge and taking the gondola from the far side. When we got off the gondola near the entrance of the park, the line was super long!

Our pups did great on the gondola, though Bailey was a little nervous about being able to see through the slats on the bridge. But they were both champs! However, if your dog isn’t acting as well as you thought they would or you really want to go on one of the other rides or go in a building, Royal Gorge Bridge & Park has a solution! They have five kennels onsite, for free! Did you catch that? Five free dog kennels! I thought this was such a great idea. And even though I thought my dogs would be fine, it was nice to know I had a backup plan if things started to get a little rocky.

There are a few other rides and activities that are not included in general admission. The Cloudscraper Zipline looks amazing! This zipline soars 1,200 feet up and across the Royal Gorge. We got to witness some zipliners while waiting in line for the gondola and it looked like so much fun! A ticket for the zipline will cost you $45 extra, and you will still need to purchase a general admission ticket. You can also experience the “World’s Scariest Skycoaster”, the Royal Rush Skycoaster at the Royal Gorge Bridge and Park. It essentially looks like a giant swing that swings back and forth over the Royal Gorge at speeds up to 50 mph. Honestly, this ride is so not for me! Check out a video of the Royal Rush Skycoaster here and choose for yourself. The skycoaster will cost you an additional $30. You can also ride with a total of three people and they give you a deal of the ride price, $55 for two riders and $75 for three riders. Both of these rides are weather dependent and have age, height and weight restrictions. So make sure to check out the rules before purchasing a ticket.

If you’re really up for an adventure while at Royal Gorge, check out the Royal Gorge Via Ferrata. Via Ferratas are protected climbing routes that use steel cables that are secured to the rock surface. Climbers attach themselves to the cables to climb the rock walls. Sounds kind of amazing, right?! Well if you’re up for climbing the Royal Gorge, this is for you! According to the Royal Gorge website, there are a few different Via Ferrata tours available, including a beginner Revelation Tour, a more advanced Royal Tour, and private tours. Pricing starts at $135 per person. Check out the website for more details and pricing. 

It’s a good idea to check the weather and the website before heading out. Depending on the weather, some of the rides may not be operating that day. But fear not, tickets are good for one full year from the date of purchase. Also, if bad weather strikes or something else happens when you’re at the park and you’re not able to do some of the rides, get your ticket validated for free next-day admission. 

There is so much to explore at Royal Gorge Bridge and Park. I feel like we barely scratched the surface of everything there is to do. We will most certainly be back!

Seven Falls

My husband and I took a weekend away to celebrate our 3rd anniversary last year. We picked Colorado Springs since we only live about an hour and a half away, and the town is known for being very dog friendly. After many internet searches about what to do in CO Springs, I heard many good things about Seven Falls. Just like it sounds, Seven Falls is seven waterfalls strung together on the side of a canyon. Pretty cool, huh?! And they allow dogs, which is always a bonus for us! However, I couldn’t really find that much information on The Broadmoor (the resort that runs the Seven Falls tourism) website for Seven Falls. So I put together a guide on what we learned from our little adventure that will hopefully help you enjoy the falls to the fullest.

First of all, parking is a little confusing. But it is free! There are “directions” on the website, but they weren’t that helpful. It’s easy enough to put the 1045 Lower Gold Camp Rd parking address into the GPS. But when you pull up to the Norris Penrose Event Center, it gets a little complicated. After driving around the parking lot, trying to figure out where we were supposed to park and with no one there to ask, we finally just parked in a semi-empty lot. There’s a shuttle that takes you from the parking lot to the falls… which was nowhere to be seen. Turns out, we parked in the wrong lot. After turning into the events center, there is a separate, not very clearly marked parking lot for Seven Falls goers on the left side down the hill as you drive in, right before you hit the events center. That is where the shuttle will pick you up. There are bathrooms available here. If you wait you may have to use port-o-potties later in the park.

If you’re like us and plan to take your pup with you to the falls, we found that dogs are allowed on the shuttles and pretty much everywhere in the park, except inside the restaurant. So don’t worry about taking your four-legged friends. Our shuttle driver absolutely loved having our pups onboard, and he gave Juno so many scratches. If you do bring your dogs, do not let them drink from the streams. We saw a warning about parasites in one area, so just best to avoid all the water.

After the shuttles drops you off and you walk down a short path, there will be a ticket booth where you’ll purchase tickets and also receive a “map” of the park, which is mostly a cartoon drawing of the .8 mile walk to the falls. As of now, adult tickets are $16 for the whole day, including re-entry for the day. But make sure to check the Broadmoor website for pricing updates. Fun sidenote: when it says “bathrooms”, it really means port-o-potties, just so you’re aware. So just make sure to bring some hand sanitizer…like we even leave home without it anymore!

You’ll see on the Broadmoor Seven Falls website that it is only a .8 mile walk to the falls from the ticket booth. Easy, peasy we thought, especially since it’s on a paved walkway. And we were right! It’s just too bad I missed the little part about the 224 steps to the top of the falls. As in 224 very steep, narrow stair steps to the tip top of the falls. Yup… missed that little detail! Well, in our minds, a little over a 1.5 mile walk round trip on a paved walkway was nothing, so we were not too worried about forgetting our water. Oops! Needless to say after the trek up and down the steps, we purchased a giant bottle at their conveniently placed gift shop. So if you’re a dummy like us, don’t fret. You can buy water at the shop. Also, if you’re not up for the walk to get to the falls, there is a tram that will take you from the ticket booth to the falls and back again for $2 per person. But if you want to go to the top of the falls, you’ll have to take the stairs.

Once you walk the .8 miles to the falls, there will be a little restaurant and gift shop. Keep walking past the restaurant and you’ll literally run into the falls…. And the 224 steps to the top. Since our dogs are in pretty good shape from going on hikes with us and playing together like 24/7, we thought it would be no big deal for them to climb the steps.

Joke’s on us!

Juno, our oldest pup about 7 years old at the time was a champ on the steps both up and down! Bailey, our 6 month old Aussie pup on the other hand, was completely freaked out that she could see through the steps and refused to climb. So Marcus had to carry her up the 224 steps and down 224 more steps on the way back. To put that in perspective, according to the website, Seven Falls is 181 feet tall. That’s like climbing a 17 story building!

Once you get to the top after climbing and I repeat very steep, very long 224 steps and reach the top, there will be a few trail options. We opted for the shorter trail this time, Midnight Falls Loop Hike which ends up being shorter than 1 mile round trip. There are two longer hikes, one to Inspiration Point and the longest, Stage Road Loop Hike which is about 3 miles, that takes you to both Midnight Falls and Inspiration Point. But we didn’t really feel up for one of the longer hikes at this time.

Once you finish hiking, it’s back down the steps. Going down is faster than going up, but the steps are pretty steep, so make sure to hang on to the railing if you’re like me and gravity seems to affect you more than the average person. There is a landing about halfway down the steps to take a quick break, if needed.

We thought we were done for the day when we got back down, but then discovered a little tunnel off to the side with an elevator at the end. We went in the elevator, with the dogs of course. No sign saying we couldn’t, so assuming that was okay. Once we reached the top, that was the view I had been waiting for. From here you can see all of the 7 waterfalls individually that make up the Seven Falls. Make sure you hit this spot up for sure!

One last thing to mention is that you can zipline at Seven Falls. When I heard this, I was like yeah, yeah. I’ve been ziplining before. No big deal. But when you see how tall those canyon walls are and how high those zipliners go when they jump off the top, it’s exhilarating to watch. Truly! You do have to book the Soaring Adventures zipling tours separately through The Broadmoor, but it looks completely worth it! We are planning a trip back, leaving the puppies at home this time to try out the zipline adventure for ourselves. Will report back!

10 Surprising Things About Colorado

When we moved from Texas to Colorado, we expected things like colder winters, mountains, and people not saying “y’all”. But we had no idea how much different Colorado would be, not just in location or climate, but everything from the booze laws and chain laws to social hiking and landscaping. Now, there are way more differences that we’ve learned than what’s represented on the list below. And remember, just because something is different doesn’t make it bad! I’ve found it very interesting to learn all about Colorado and share what we’ve learned with people who may not have known these things either. So here’s a list of the most surprising and interesting things we’ve learned since moving to Colorful Colorado . 

  1. You can’t buy wine in the grocery store. Seriously! When Marcus and I first got here, we went to Target to get groceries for dinner and a bottle of wine. And I could not find wine anywhere! So I eventually Googled it and found out that you have to go to the liquor store. They literally just started selling full-strength beer in grocery stores in January of 2019. But as for wine, you have to go to the liquor store. But on the plus side, liquor stores are open on Sundays.
  2. You can basically find a craft brewery on every corner. As I’m sure you know, craft beer is HUGE in Colorado. Seriously though, you can probably throw a stone in any direction and you’ll hit a brewery! According to brewersassociation.org, there are over 400 breweries in just Colorado, second only to California. And it’s growing every year! Since beer is everywhere here, you’ll often see it or some kind of alcoholic beverage with any meal while eating out. Which is good with me, because I love a mimosa with my brunch! 
  3. Many Coloradans can drive in the snow, but don’t like to drive in the rain. And when I say “can”, I really just mean they feel more comfortable driving in the snow rather than a heavy downpour. Now this doesn’t mean that I don’t pass several cars on the side of the road who lost control from going way too fast on a wintery day. Because yeah, that happens. But when it comes to rain, it seems like cars tend to drive slower. 
  4. There are not many thunderstorms in Colorado. I mean those all-night long, house-shaking thunder storms that result in several inches of rain that we get in the south. Marcus and I thought it was the weirdest thing when we hadn’t had a storm in so long. It does rain, especially in the spring and summer. But you’ll get random 15 minute afternoon downpours that just come and go so quickly. Although it really is sunny most days in Colorado, Marcus and I are convinced that the reason they say you get 300 sunny days a year in Colorado is that they just count if it’s sunny at some point of the day, even if it’s cloudy later. 
  5. Snow gets old after a while. Coming from Texas, I had never really experienced a “real” snow before, well at least that I remember (I was a baby, ha!). So the first “real” snow was very exciting! But then, you get the 2nd snow, then the 15th snow and so on. And it’s really just cold!! And since the weather is so crazy here, I’ve seen snow as early as October here and as late as May. It even snowed in June this year in the mountains! Don’t get me wrong, I do enjoy snow, but after months of scraping your windshield, shoveling the driveway (shout out to my awesome hubby for this!) and driving on icy roads, yeah I’m ready for summer.
  6. Driving in the mountains takes forever! We moved from Texas, so I understand long car rides. That was just a part of living there. So when we first moved to Colorado, I didn’t understand why it took so long to get places when it was only a few miles away. Well, we soon learned it’s because driving up a mountain takes time, especially in the winter. So it may only take you like 20 – 30 minutes to drive to the base of the mountain, but then you spent almost an equal amount of time trying to drive up the mountain. 
  7. Sooo many Subarus…. literally so many!! We figured this one out when we first visited and were looking for a house. And it’s one of those things that you can’t unsee. Once you realize it, you just see Subarus everywhere! Then we wondered why so many? We found out that Subarus come standard with All-wheel drive, something that really comes in handy during these Colorado winter months. 
  8. Hiking is a social activity. I was used to people going to the movies, having an outdoor BBQ, spending the day at the lake or hanging out at a bar, which people still do here, it’s just after a hike. Here, people go hiking as a family, like the whole family. Even babies in carriers. Or hiking with their friends. You’ll often see several families hiking together. College students will even go for hikes to hang out. Obviously, you still see people doing normal activities, but more often than not, if it’s a nice day, everyone will be hiking. 
  9. It’s very rare to see grass right against buildings. I didn’t know this one until we were looking to buy a house. Marcus started noticing at all the houses we were looking at that everyone had some sort of rocks in their landscaping and that the grass was never right next to the house. Our realtor explained that the soil in Colorado has lots of Bentonite or other water-absorbing minerals. When over saturated, Bentonite will rapidly expand causing the foundation of your house to shift. So to avoid that, people will use rocks (no moisture) right up against their foundation instead of grass, which obviously needs moisture. 
  10. There are low-quality air days called Ozone Action Days. I first heard this on the news, and I was like what the heck is that? Isn’t Colorado with all it’s great outdoors supposed to have fresh mountain air? Yeah… nope! On low-quality air days near Denver, they recommend those with respiratory issues should stay indoors and keep physical activity to a minimum. They even suggest on those days that you bike or carpool to work so you don’t make the problem worse. Crazy, right?!

We’ve experienced so many new and exciting things since moving to Colorado. But we are loving every minute of living here and enjoy learning about our new home. I can’t wait to add more things to this list as we immerse ourselves even more into Colorado life!

5 Easy July 4th Treats

I love holidays! All the various decorations, being with family and generally, you get the day off! One of my favorites since I was a kid is the 4th of July. I loved being outside, going to the town fair with my family in those matching Old Navy shirts (you know the ones), the fireworks and of course the great food!

Themed food is some of the most fun to make (and eat). However, I am no great chef, by any means! So the simpler, the better! I put together some easy to make USA themed treats for your backyard BBQ or just for your family to enjoy. These are so easy, even I can make them! You can even get the kids involved to help you make and decorate these fun treats. And the best part is that they include a lot of sprinkles!!

White Chocolate Dipped Pretzels

What You Need:

  • Pretzel Rods
  • Melting White Chocolate
  • Sprinkles

How:

Melt the white chocolate per the bag instructions. Dip the end of the pretzel. Sprinkle on top and let set. Store in airtight container.

Homemade Ice Cream Sandwiches

What You Need:

  • Cookies 
  • Vanilla Ice Cream (Since I’m lactose intolerant, I used Breyer’s Lactose Free Ice Cream)
  • Sprinkles (or chocolate chips, M&Ms, etc.)
  • Plastic Wrap

How:

Bake the cookies. I used Pillsbury break-and-bake sugar cookies, but other flavors will work too. You can also bake homemade cookies if you’re an overachiever. Put the cookies in the freezer for about an hour. You’ll want the cookies to be firm when making the sandwiches. Once the cookies are frozen, place a scoop of ice cream on one cookie. Take another cookie and place it on top of the ice cream, creating a sandwich. Sprinkle your desired topping on a plate. You can use sprinkles, M&Ms, chocolate chips or whatever else you can think of. Roll the edge of the ice cream sandwich in the topping. For storage, wrap in plastic wrap and keep in the freezer.

Red, White & Blue Cinnamon Rolls

What You Need:

  • Can of Cinnamon Rolls
  • Red, White & Blue Sprinkles

How:

This one is so easy and looks so cute! All you have to do is cook and ice the cinnamon rolls like normal and just add some sprinkles to the top. This is a great and easy idea for those occasions like birthdays, Halloween, Valentine’s Day, St. Patty’s. All you have to do is change the color of the sprinkles. The kids can even decorate their own cinnamon rolls however they want!

Red, White & Blue Popcorn Drizzle

What You Need:

  • Popcorn (microwave or already popped)
  • Meltable chips in red, white and blue (You can also just use white and use food coloring to get the red and blue colors)
  • M&M’s (optional)
  • Sprinkles (optional)

How:

First pop the popcorn, or you can use pre-popped popcorn from the store. Spread out popcorn on a cookie sheet lined with parchment paper, foil or freezer paper. Melt the chips per the instructions on the bag, one color at a time. I like to leave white for last since it will show up better once the other colors are already on the popcorn. I found colored chips at Michael’s, which was so much easier than using food coloring. After the first color is melted, use a fork to drizzle on the popcorn. Do the same with the other two colors. If you want to add sprinkles or M&M’s for an extra touch, sprinkle a little on in between each color drizzle. And that’s it! You can store in an airtight container.

Red, White & Blue Fruit Kabobs

What You Need:

  • Strawberries 
  • Raspberries 
  • Blueberries 
  • Bananas
  • Wooden Skewers
  • Melting White Chocolate (optional)

How:

Arrange your fruit on the stick. I picked a red, white and blue order. You can stop there or if you choose, or you can drizzle some white chocolate over the fruit for a finishing touch. Super easy, yummy and healthy!


I hope you enjoy all the family time, fun and food this 4th of July holiday!

Happy Independence Day!

Garden of the Gods

Covid-19 Update: Garden of the Gods Park is still open. The Visitor’s Center is temporarily closed. Make sure to check the Garden of the Gods website for updates, openings and closings.

Colorado Springs is a one of a kind town in Colorado. Home to Pikes Peak, the Olympic Training Center, Seven Falls and so much more. But perhaps the most popular attraction in CO Springs is the Garden of the Gods. And for good reason too! If you’ve never been to the Garden of the Gods, go! I’ve never seen anything like it. It’s quite the wonder that everyone should experience. And the best part… it’s free! 

The park opens at 5 AM and closes at 9 PM, but hours vary in between the Summer and Winter seasons. Garden of the Gods is a great place to go during good weather. But they are open year round. Make sure to dress accordingly if you plan to go in the Winter. Also, if you go after it snows, make sure to watch for ice and slippery parts on the trail. 

Start at the Visitor’s Center. The first time I visited the park with my husband and friend from Texas, our GPS took us through the back part of the park and we got completely lost. It’s a large park! So make sure you punch in “Garden of the Gods Visitor’s Center” into your GPS and it’ll bring you right to it. And you can’t miss it either once you see it. 

Once you’re in the Visitor’s Center, you’ll be able to pick up a map. The workers can explain the trails to you if you need. There are a few exhibits in the center to look at.There’s also a coffee shop, gift shop and it’s a good place to stop at the restroom before you start the trail. There is a bathroom at the beginning of the main trail, also. But the best part of the center is the view from the balcony. From the balcony, you can see the entrance to the park along with the iconic view of the park. Totally worth a quick stop before you hit the trails. 

Don’t stay parked at the Visitor’s Center. After you check out the center, move your car to another lot that’s closer to the park. That also allows other people to be able to park at the center as well. It’s easiest to park in the main parking lot, which is connected to the main trail. This is not the lot across from the Visitor’s Center. Drive down Gateway Road towards the park and keep going until you reach Lot P2. If this lot is full, don’t worry. Each parking lot in the park connects to a trail. We even parked in the lot across from the Visitor’s Center and walked to the main lot since it was full. It was a little far, but we were going for a hike anyways, so we didn’t mind. 

Here is a link to the park map for reference.

The park is really big! According to the Garden of the Gods website, there are over 21 miles of trail to explore. So you won’t be able to do every trail in one visit. I recommend the main trail for your first visit. The main trail starts at the main parking lot and leads to the Central Garden Trail, which is basically one big circle. If you take the same trail you started on after you complete the circle, it will lead you back to the parking lot where you started. On this trail, you’ll see some of the most popular rock formations of the park like the “Kissing Camels”, “Tower of Babel”, and “White Rock”. Make sure you take the smaller loop also, so you don’t miss the “Three Graces” or the “Cathedral Spires”. If you’re not a hiker, do not be intimidated by this “trail” at all. It’s not really even a trail, more like a really long paved sidewalk. Super easy to walk and accessible for everyone. I’ve seen both strollers and wheelchairs on the trail. 

Another popular exhibit is Balanced Rock near the back of the park. You will need to drive there since it is all the way across the park. There is a parking lot if you want to get out and look. But you can also just drive under it and see it too. There’s a trading post near the back of the park also, with a gift shop and snacks. 

As you’ve probably figured out by now from the pictures, dogs are allowed in the park, they just have to remain on a leash. In fact, Colorado Springs as a whole is very dog friendly. If you’re looking for other things to do with your pups, check out Seven Falls, Pub Dog and Manitou Cave Dwellings.

Since Garden of the Gods is free, it’s a place you can visit again and again. Everytime we have friends or family in town, we always try to take them here. It’s such a magnificent park with great views and something for everyone to enjoy. I can’t wait for our next visit to enjoy even more that the park has to offer.

There are way more adventures at Garden of the Gods than just hiking. There are all kinds of tours, both self-guided and tour guided, including Jeep, Trolley and Segway tours. There lots of rock climbing available and you can even rent a bike for the park as well. Make sure to check out Garden of the Gods website for more details and to start booking your adventure!